Monday, May 18, 2015

Flats and Handwashing Challenge: Recap


Last week got very chaotic around here and I wasn't able to keep up with blogging everyday of the challenge, so I though I'd do a recap of my week.

The Stash!
I used a flats stash of:
7 Orange Diaper Co Bamboo toddler squares ($14 each new, I bought used of the BST)      $98
12 Target flour sack towels ($3.99/4 at Target)                                                                        $12
8 T-shirt flats (old shirts from my closet)                                                                                FREE
5 Flannel receiving blankets (left from baby shower gifts/hand-me-downs)                         FREE
                                                                                                                                              -----------
                                                                                                                                                $110

I used a mixture of covers including wool, Flip, TushMate, Best Bottoms and Puddles and Posies. Some of these covers are on their second or third baby so I didn't calculate the cost. The cost of my bamboo terry flats was what really drove up my total, but I LOVE them so!

For closure I have traditional diaper pins, Boingo Baby and Snappi.


Wash Routine!
The poopy diapers were sprayed in the toilet first with my SprayPal sprayer and placed in a 6 gallon bucket of water with some BacOut. Wet diapers went straight to the pail. When it was time to wash, I used a plunger to agitate, dumped them out, rung them out and filled the bucket again with cold water. Agitate again, dump, ring, fill bucket with hot water and some detergent, agitate (VERY well this time), dump, ring, cold water rinse, agitate, dump and ring!

I hang my flats on a collapsable drying rack and 2 Ikea octopus hangers that hang in my sunroom.

I've also been known to tie ropes across my deck! (I can't use anything permanent in our yard.)
Favorite Fold!
Origami! Hands down!

Origami fold with a Snappi closure


A receiving blanket folded origami style


My conclusion!
Everyone can cloth diaper! Your age, work status or financial status don't matter. You can buy the fanciest, most luxurious diapers available or use some t-shirts you already have laying around. No matter what, you're doing something good for your baby and good for our environment!

We're going to keep it up! Last year we used flats and hand washed only for 3 months after the original challenge!

Dr. Venkman used a t-shirt as a cloth diaper for baby Oscar in Ghostbusters 2


Now you see how easy it is even on the tightest budget. Why not give it a try. Leave me a comment and let me know your experience with cloth diapering?
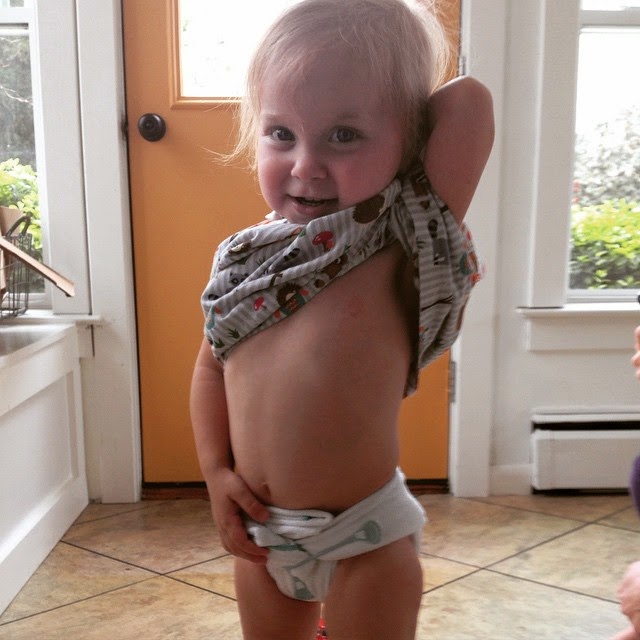


Leah in the same flour sack towel flat at 3 months and 2-years-old!
The only difference is a second FST folded inside now for extra absorbency.


Tuesday, May 12, 2015

Day 1: Why I'm taking the Flats and Handwashing Challenge

Each spring for the past 5 years, Kim at Dirty Diaper Laundry has hosted The Flats and Handwashing Challenge! 


My newborn stash for Leah (May 2013) was entirely flats and I signed up for the challenge that year, but, since she decided she wasn't going to be born until the week before the challenge, I decided to simply challenge myself. I participated last year and loved it so much, I kept up with the hand washing for 3 months instead of just one week!


I advocate for cloth diapers year round and it's no secret that cloth diapers have saved our family a TON of money, but the Flats Challenge gives me an opportunity to really shine a light on my favorite style of diaper: FLATS!
A "flat" cloth diaper is simply 1 layer of fabric. It can be folded in a number of different ways to achieve the fit and absorbency needed.
A modern version of a flat cloth diaper:
Bamboo double loop terry "toddler square" by Orange Diaper Company
(measures approx 28"x28")

Why do I love flats? 
They wash well, rinse well and dry fast! All my favorite things! And all of those reasons also save you money! Not only can flats be a less expensive investment when starting out, but it takes less water to wash them, you won't need additional rinses and they dry quickly on a line or rack making the electric dryer unnecessary!


The Challenge:
Use only flats for 7 days. No washer, no dryer!


Why not give flats a try? It's a win-win!

#bringingflatsback #thisisyourgrandmothersdiaper
#flatschallenge #traditionaldiapers


Saturday, May 9, 2015

Common Cloth Diapering Terms

OS: One-size. An adjustable diaper made to fit a wide range of shapes and sizes.

AIO: All-in-one. A one-step diaper system that has the soaker layers and waterproof cover all in one step.

AI2: All-in-2. A diaper that has 2 pieces. Most commonly a waterproof shell with a separate soaker that snaps in or is sewn in on only one edge.

Soaker: The layers within the diaper that soak up moisture.

Doubler: Extra layers added to make the diaper more absorbent. This differs from a soaker because it does not stand alone, but is added along with the soaker to "double" the absorbency of a diaper.

Liner: A single layer laid on top of the soaker between the baby and the diaper. Can be disposable and used to make poop clean-up easier or a re-usable fabric such as fleece to help wick moisture away from baby's skin.

Boingo: BoingoBaby™ cloth diaper fasteners.

Snappi: SnappiBrand cloth diaper fastener.

PUL: Polyurethane laminate. A compound fabric made by laminating a cloth fabric to a thin film of polyurethane with a chemical process, thus making it waterproof.

TPU: Thermoplastic polyurethane. Basically the same as PUL, but the laminate is heat-bonded to the fabric rather than chemically-bonded.

Lanolin: A yellow waxy substance secreted by wool-bearing animals. Wool soakers need to be treated with lanolin periodically to maintain their water-resistant traits.

Hook and Loop: A type of closure also commonly known by the brand names Aplix™ and Velcro.

Stripping: A process by which your diapers and inserts are treated and “stripped” of mineral build-up, ammonia and/or soap residue.


Wicking: Wicking is the transfer of moisture from one place to another.  It is good when moisture is wicked away from baby’s skin through a stay-dry fabric. Wicking is a bad thing when moisture finds a weak spot or exposed area to leak out of. 


{Updates and additions coming soon}

Thursday, March 26, 2015

Cloth Diapers 1.0: Styles

Congratulations! You've decided to cloth diaper! Your baby and your Earth will thank you!


But where to begin?????


In this post I will cover the basic styles of cloth diapers to help you determine what will work best for your unique baby and circumstances. There will be subsequent posts later next week that delve further into fabrics, popular brands and other options.


These need a cover. They are not waterproof on their own:


Flats – a square of fabric, usually 1 layer.
  • Many different folds
  • Snappi, Boingo Baby or Pins
  • Fits nb to toddler
  • Rinses well, dries fast!


Prefolds – A rectangle of fabric, thicker in the center.
  • Different folds
  • Snappi, Boingo Baby or Pins
  • Sized
  • Rinses well, but takes longer to dry than a flat.
  • The “work horse” of CDing.


Fitteds – Shaped, often sized, w elastic placement and wings.
  • Easy-peasy. No folding.
  • Some can be purchased “snapless.”
  • Sized or OS
  • Excellent choice for beginners, caregivers, daycare, etc.
  •  Hybrid fitted – has a layer of fleece for more water resistance, still needs a cover for extended wear.


 Cover + Insert Systems - A diapering system that has a reusable cover or shell, but uses inserts specific to the brand that would be washed between uses.


  • Cost effective: No need to purchase as many covers because they can be reused between washes.
  • Versitile: Most covers can fit over many different diaper styles and brands.


These do NOT need a cover. The waterproof layer is built-in…


Pockets
  • Waterproof outer, stay-dry inner. Open on one end creating a "pocket"
  • Stuff the pocket w chosen absorbent insert to complete the diaper
  • Dries faster than AIO
  • Flexible system
  • Bonus! Use without inserts as swim diaper!

       
      All-in-Two
  • Waterproof shell w plush inner, plus soaker
  • Usually snaps in


    All-in_One
  • Waterproof layer, plush innner, soaker sewn in.
  • Considered easiest for quick changes.

Monday, January 13, 2014

Stripping your Cloth Diapers

Before you say, "but my diapers don't stink", consider this:


My diapers were clean when they went in the tub with hot water and RLR.
The water looked like this only 5 minutes into the soak.
I hadn't even agitated them yet.

They didn't stink either.


*UPDATED 1/22/2013*
The diaper soaked for 2 hours. I added 2 pots of boiling water over that time and also agitated them with a plunger.
This was the water after all that:

And I thought they were clean!


~Patricia~

Friday, January 10, 2014

Dying My Osnaburg Wrap: Phase 2

I made a baby wrap from osnaburg, I gradient dyed it purple. Although I was proud of it, I didn't love it.


So.......I dyed it some more!

I gathered my supplies:
~2 packets of Dylon in Ocean Blue
~Salt
~My hangers and binder clips
~My big bin for the dye bath
~Smaller container for mixing dye and salt


All set up:

See how the bottom of the wrap is just barely brushing the bottom of the bin?

Mix the dye and add water like I did in my previous post:

I raised the water level every 15 minutes until I had almost reached the top of the bin.
Then, I rinsed and took it to the washer.

This is what it looked like before I put it in the dryer:


And dry:


Now I LOVE it!!!!!!!


~Patricia~

Dying My Osnaburg Wrap: Phase 1

So, I made my own baby wrap! If you want to see how click over here for the step-by-step.
I also dyed it! Here's how!

You will need dye. There are different brands and types. This was my first time dying a wrap and I didn't want to spend a lot of money, so I picked up 2 packets of Dylon from a local craft store. With this type, you do not need to do a soda ash soak because there's soda ash in it. (Some will argue that the presoak will help the colors be more vibrant, but I have no personal experience with the differences.)

You will also need:
-A large bin
-A separate smaller bin or pitcher for mixing dye/salt and for adding water to your dye bath.
-Hangers (pants hangers work best, but I used what I had, regular hangers and binder clips)
-A tension rod
-Salt....LOTS of it! (This is your fixative...it helps "fix" the dye to the fibers ;)

I guess I should mention that there are countless dying technicques. I wanted my color to start bold on one rail and gradually get lighter. This is called a gradient dye or "grad dye."

Here's my dye:

Here's my set-up:

See how the wrap is hanging into the big (green) bin?


Wet the fabric down, mix your dye in smaller container per the directions on packet and put in the big bin. (pour very close to the bottom being careful not to splash). Raise water level to where you want your first grad to end.

Set a timer and go about your day! I did 15 minutes.
When the timer sounds, mix more salt with more water and add water to the next desired height. (I added 2 1/2 of my containers full of water each time.) You also want to add salt each time. I mixed 3/4-1 cup of salt with the first addition of water.
Again, pour down the side of the bin or as close to the dye bath as you can to prevent splashing.

Do this over.....and over.......and over....and over......until you reach the desired height of your gradient. When mine was as far as I felt like taking it, I dropped the whole wrap into the bath to complete the purple-ification!
This is what I got:

It looks really dark, but hasn't been rinsed yet.
Remove dye bath container and rinse the wrap until the water runs clear. (Or close to clear).
Wash and Dry!

I ran mine on a pre-rinse before I washed with detergent and dried, just to make sure I got all the excess dye out.

TA-DA!


Not bad for my first dyed wrap, but I wasn't completely happy with it, so I dyed it some more....coming in Part 2!

~Patricia~